How to setup a Multiwii Airplane and FlyingWing
updated 2014-10-18
Airplane uses same Hardware as a MultiWii copter.
Arduino PRO MINI. 5V 16MHz, ProMicro or Arduino Mega.
- Gyro
- Accelerometer (Optional)
Acc only needed for Auto leveling.
Start with a trimmed suitable plane.
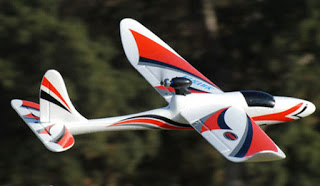
Dynam EZ-Hawk was my choice but any airplane will work.
Connect servos to the Arduino.
To use D7 on Mega boards you need to use one of the versions in my Branch.
FixedWingNav_Dev
And in Config.h comment
//#define MEGA_HW_PWM_SERVOS
Otherwise Servos will be different pins
FixedWingNav_Dev
And in Config.h comment
//#define MEGA_HW_PWM_SERVOS
Otherwise Servos will be different pins
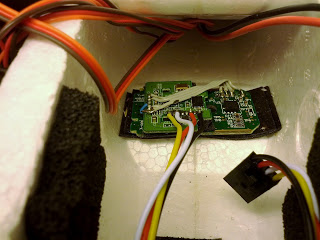
My Installation
Sensors work best if mounted as close to CG as possible.
I use multiple layers of double-sided foam tape.
I use multiple layers of double-sided foam tape.
********************************************************************************
Setup Transmitter
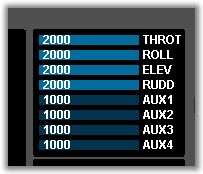
Set TX channels to full rates it should reach between 1000-2000µs in the Gui. Failsafe function will recognize it as abnormal input if Rates reach below 1000µs .
If you push both sticks in upper right corner all channels should show 2000 in gui.
Correct the servo directions in the TX.
Results is the same in both Mode1 & Mode2
********************************************************************************
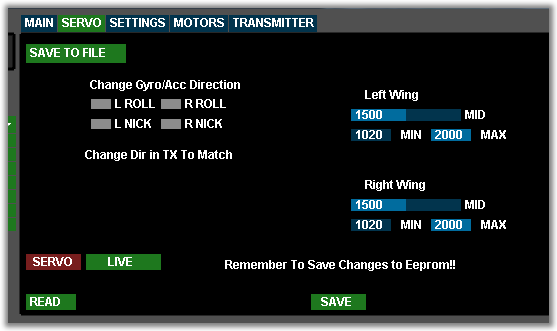
Setup Servos
Gyro or Acc assisted Mode.
Check if Gyro move servos in right directions.
Lift a wingtip and Aileron goes up.
Lift the tail and Elevator goes up.
Rudder moves in same direction as the tail.
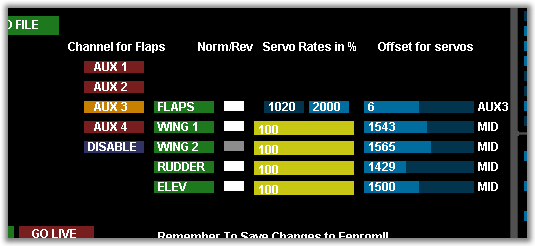
The Servo Tab looks a little different for FlyingWings.
Servos connect to same Wing Servo pins as the Airplanes
Adjust Midpoint and the endpoints.
The elevons can be reversed for each function.
Setup in PassThru Mode.
Set all TX trims to zero and check the value when the sticks centers.
If it's not 1500 change #MIDRC to your Midrc in the code.
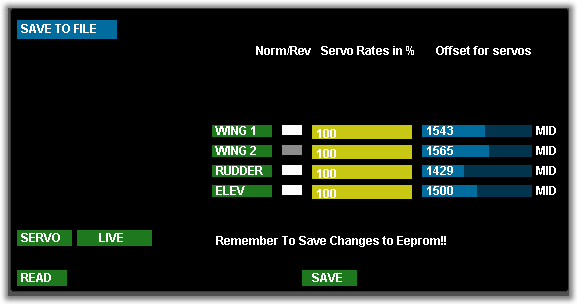
* Use the Servo Tab in Gui to adjust Servo Offset to center the Control Surfaces.
Adjust mechanically on the linkages to keep offsets as small as possible.
* Use the Servo Tab in Gui to adjust Servo Offset to center the Control Surfaces.
Adjust mechanically on the linkages to keep offsets as small as possible.
* Set the Servo Rates to maximum recommended for the model.
Press the Save to file button to save Servos.txt in
same folder as MultiWiiconfig.exe
This settings can be pasted in Config.h and you will not loose
the settings if you reset PID's.
********************************************************************************
Issues With Rudder
If you experience weird function on the rudder.
And the rudder "Drifts" and becomes offset in gyro and Level modes.
Rudder have a tendency to try to hold the heading during Aileron/Elevator turns.
It can make the plane fly Sideways and other strange phenomena.
The cure is to Set YAW_I = Zero.
The cure is to Set YAW_I = Zero.
********************************************************************************
=========================
#define MAXTHROTTLE 2000
Because you want Full Power sometimes!
Mwii uses 1850 for MultiCopters.
Flaps Settings
Conventional Flaps
Using servo[2] (A2 on ProMini )
//#define FLAPS // Enable Flaps .
with the AUX buttons to the left.
Set endpoints and direction.
Flaperons
//#define FLAPPERONS AUX4 // Use Aileroins as Flaps .
#define FLAPPERON_EP { 1500, 1700 } // Endpooints for flaps on a 2 way switch
#define FLAPPERON_INVERT { 1, -1 } // Change flap direction
Make flaps move slow Higher value is Higher Speed. Effects Both types of flaps.
//#define FLAPSPEED 3
********************************************************************************
Flaps (Flaperons)*
Select a channel to control your flaps with.
Endpoints is the preprogrammed positions for the flaperons .
Endpoints for flaps can also be programmed in the TX .
Then set
FLAP_EP { 1020, 2000} in the code.
Servos
Totally 8 servos is available.
Default mix uses.
2 Wing servos
1 Elevator
1 Rudder
1 Throttle servo or esc.
A0 & A1 can be used for a gimbal.
A2 Is used for conventional Flaps or Camera trigger.
Acc Calibration
Place the plane on a stable surface.
Vings Level with nose in expected Attack angle for level flight.
Normally a few degrees up.
Memorize the planes attitude in flight this should be Level for Acc.
Passthru
Sends Rc commands direct to servos.
No influence from sensors.
No influence from sensors.
Gyro Mode (Acro)
This is "Normal" mode when nothing else is selected.
The plane should compensate for movements. (Wind Gusts etc)
The plane feels stable and locked in but still able to loop & roll.
Stall speed is lower and it can be necessary to "Push" it down in landings.
Stable Modes
With the sticks centered the plane will self stabilize.
Returning to level flight from almost any situation.
Provided there's enough Altitude for recovery.
Horizon Mode Allows rolls and loops. Levels with centered sticks
This is a comfortable flight mode for FPV.
This is a comfortable flight mode for FPV.
Angle Mode also limits how much the plane can tilt.
Gives a Stiff feeling and is only recommended for beginners.
Gives a Stiff feeling and is only recommended for beginners.
Preflight setup
After you have changed the servo Rates
you can set Dual rates and Expos in the Transmitter.
Engine must be Armed to prevent motorstart by accident..
It can be Armed from AXU-channel if it's setup in the gui . (recommended)
Or with stick combination min throttle & max rudder.
Take of in Passthru.
Switch mode on safe height.
Activate Assisted modes and feel the difference.
Level-P value will Reduce the maximum throw in Level-Mode.
GyroSmooting
If the gyros feels very sensitive (Hysteric).
Activate LPF filtering for the gyro. 42 Hz or lower is a enough for planes.
In worst cases use GYRO_SMOOTHING
#define GYRO_SMOOTHING {20, 20, 3} // separate averaging ranges for roll, pitch, yaw.
Values must never be below 1.
(*)
Flaperons:
A mix where ailerons also works as flaps for simpler models without separate flaps.




10 kommentarer:
Can you show how the gyro is mounted in the plane?
Thanks,
Steve
http://www.ilovefpv.com
Thanks for the tips!
Worked fine with me!
Links:
http://www.multirotores.com.br/forum/topics/multiwii-para-aviao-e-helicoptero
and
http://www.e-voo.com/forum/viewtopic.php?t=136265&highlight=
I am not shure about the connection of servo[0] to servo[3] as you write D34/44, D35/45, D33/46 and D37.
Normally (e.g. for octocopters) multiwii uses Pins 7, 8 9 and 10. (addtitionally to 2,3,5,6).
Thank you
Kai
@Kai
From def.h
pinouts for Mega
SERVO_1_PINMODE pinMode(34,OUTPUT);pinMode(44,OUTPUT);
SERVO_2_PINMODE pinMode(35,OUTPUT);pinMode(45,OUTPUT);
SERVO_3_PINMODE pinMode(33,OUTPUT); pinMode(46,OUTPUT);
Thats what i followed for the guide.
Hey Patrick
I went to the complete story of the multiwii forum and would like to thank you for all the work you did !
1 question though..
Can you please give me a direct link to the version you advise to load as I see so many different version and am confused..
Cheers,
Frank NL
@Frank
I'm glad you like it..
Near the top of the page i link to the MWii downloadpage.
Use the latest ver.
At the moment V2.1.
If you use a MEGAboard you need to use the dev verion r1143 or newer.
http://code.google.com/p/multiwii/downloads/list
Hej Patrik
Jag har använt mig av dina guider när jag försökt montera MW i mitt Easystar 2.
Jag använder mig av en Pro mini med en GY-86 och i2c gps och FW_Nav_1140402.
Jag har haft problem med bla vibrationer men jag tror dom problemen försvann med hjälp av gyro smoothing/filters.
Planet ser ut att fungera som det ska när man testar på marken men i luften uteblir funktionen.
När jag slår på Horizon så vet man aldrig vad som händer, ibland s tvärdyker planer eller/och svänger kraftigt.
Ibland så flyger den rakt men när jag vänder med hjälp av rodret blir det samma sak när planet ska gå rakt igen.
Blir inte riktigt klok på av som kan vara fel och tar genvägen och frågar dig om råd.
M.V.H Richard Särenfors
Hej Rickard,
Skumma saker kan "Reparera" sig själv om man Rensar Eeprom när man Lägger in ny Version.
För mycket Smoothing kan ge långsamma reaktioner på servon.
På en Easystar borde du klara dej utan smoothing om propellern är balanserad.
LPF för MPU6050 på 42hz eller lägre brukar vara bra att starta med.
Om du aktiverar RTH så kommer liknande saker att hända när GPS tar över.
Med enbart HORIZON aktivt ska planet flyga rakt om Accelerometern är kalibrerad rätt och Sensorerna sitter fastmonterade i planet.
Patrik
Hej
Jag har märkt det du säger ang. EEPROM och har nu mera för vana att göra en rensning innan jag lägger in ny sketch.
Jag har stänkt av smootning efter jag skrev förra gången och har LPF på 10Hz för att inte få fladder i servona. Jag använder original proppen som jag inte tycker andas kvalité'.
Som det är nu så flyger den rätt bra men man vet aldrig hur den beter sig när man slår på eller svänger med horizon aktiverat.
Jag måste flyga rakt en stund (typ 5 sec) innan jag lår på horizon för att den ska fortsätta flyga rakt.
Svänger jag för snävt så den får för brant pitch så håller den kvar den och dyker tills jag inte vågar mer och slår av.
Slår jag på direkt igen dyker den direkt men om jag flyger rakt en stund så går det bra.
Går det att stänga av yaw direction när man använder horizon. Dom kraftiga svängar jag beskrev innan beror på att den försöker komma tillbaka till riktningen jag hade förra gången jag slog på horizon med kraftiga roderutslag som följd.
När den flyger som den ska kan jag göra kraftiga utslag på pitch och roll utan att planet dyker.
GPSen har jag bara provat på skoj men den har ingen prio i detta läget.
Richard
The result of the comments in Swedish.
Rudder have a tendency to try to hold the heading during Aileron/Elevator turns.
The cure is to Set YAW_I = Zero.
Skicka en kommentar
Länkar till det här inlägget
Skapa en länk